Off-Road 4×4 Driving Guide
The following off-road driving guide is provided as an educational resource and is reproduced with acknowledgement to Nissan South Africa. This Off-Road 4×4 Driving Guide is published in four parts:
PART 1: General 4×4 Terminology, Critical Angles and Dimensions, Power Sources, Transmissions, Locking Hubs, Braking Systems, and Chassis and Suspension.
Part 2: Vehicle Recovery safety considerations and equipment, which includes: Ropes, Straps and Cables and Winching.
PART 3: Terrain Crossing and includes advice on how cross-diverse terrain, general obstacles encountered, ascents and descents, driving in a convoy, pre and post-trip inspections, and tools and spares.
Part 4: Off-road Tyres and Tyre Tips.
Off-Road 4×4 Driving Guide: PART 1 – 4×4 Terminology
Leave A Good Impression
Going off-road is a wonderful way to explore Africa’s natural heritage and get to inaccessible terrain but the vehicles have the capacity to severely damage sensitive eco-systems — we owe it to future generations to be careful when off-road, the impression left behind should be one of a responsible off-roader and not strips of black rubber, ruts from wheel spin and rubbish strewn across the countryside.
It’s really quite simple, one has to care for the environment and the rights of others – be they the local populace or fellow off-roaders.
Understand the consequences of off-roading, and if necessary attend a driver training course that covers off-road technique, the environment and vehicle recovery.
Plan your trip and, in leaving a good impression, try to improve on the terrain: repack ruts with rocks, take out your litter and anything else you may find – spare the route the negative effects of your passage.
Engage 4×4 when leaving the tar, high-range gearing for gravel roads and low range as you start trails and obstacles. This will immediately limit the impact of your passage.
Off-Road Guidelines:
- Travel in terrain that is suited to your vehicle.
- Stay on the designated route and avoid the temptation to create a new track unless absolutely necessary. Be aware of sensitive areas and avoid them at all cost.
- Adhere to speed limits even in off-road situations, they are there for a reason.
- Respect the local population, fauna and flora. Practice safe convoy rules and avoid creating dust.
- Use eco-friendly soaps and cleaners and do not dispose of toxic materials such as old oil etc.
- Use water with care and do not camp too close to waterholes, this may scare off animals.
- Practice safe fire techniques, check for restrictions and do not make fires on the drip lines of trees, as this will harm their roots.
- Remove your litter and do not wash dishes or clothes in rivers or dams. Use the cat-latrine technique for toilets.
- Obey signs and close all gates when passing through.
- Practice safe recovery techniques and restore any possible damage after badly stuck vehicles have been extricated.
- Always use tree protectors when winching to avoid ring-barking trees, ensure minimal movement when winching as even with a tree protector one can chafe the delicate bark of a tree.
- Avoid wheel spin as the flora and ground cover bind the topsoil, an open rut can start soil erosion in the rainy season.
- Never ride over young plants and saplings they are the future shade and food for animals that live in the area.
- Remove trees that block the road if possible, rather than driving past them, creating a new track for others to follow.
- When camping, respect the rights of others. Avoid loud music and excess drinking – we are all in the bush to enjoy the solitude, loutish behaviour can spoil the experience for all.
Environmental Degradation:
Driving on beaches has been prohibited in South Africa for some time now, but it is possible to drive on beaches in neighbouring countries. However, all indications are that this may be stopped simply due to bad behaviour and the lack of capacity to police these areas. General guidelines however are:
- Use demarcated exit and entry points.
- Ensure that driving is permitted. Obtain the necessary permit.
- Reduce tyre pressure. A softer tyre causes less damage and gives more traction.
- Do not pollute.
- Drive on the wet sand below the high tide mark, but check local requirements. On the East Coast, turtles breed above the high tide mark, but in certain areas on the Western shores, crustacean breeding populations exist.
- Never drive on beaches designated for swimming, always consider other people, vehicles and your passengers.
With regard to sensitive areas, be aware of the following:
- Dunes are vegetated sand ridges adjacent to beaches where plants and small animals live. They are sensitive eco-systems and can be damaged by irresponsible driving.
- The Backshore Area is the area between the dunes and the high tide mark. Turtles lay eggs here; plants grow and regenerate, making them vulnerable.
- Sand and Mud Flats are flat un-vegetated areas adjacent to shores of estuaries and lagoons. Regularly flooded by salt water, they are home to crustaceans such as mud prawns. Vehicle weight compacts the sand and kills life.
- Shell Middens. That prehistoric people lived along the coast is evident by the deposits they left behind. Some of these valuable archaeological deposits are 120 000 years old. They are found in dune areas all along the western and eastern coasts. Middens can be identified when you find the following: bones and bone fragments, stone artefacts, ostrich shell fragments, beads, seashells, rounded and burnt stones charcoal and ash. Off-road vehicles can destroy such a site in minutes!
- Salt Marshes. Low lying salt marsh areas are situated in estuaries and alongside lagoons. They are the breeding place for crabs, shrimp, fish and birds as well as certain vegetation.
- Intertidal Zones. The area between the low and high tide marks is subject to powerful wave action. Relatively resilient, the more sloped zones can suffer from erosion caused by 4×4 driving.
These relate to beach driving, banned in South Africa around 1994 when the Environmental Conservation Act set out controls, the only exclusions today will be for nature conservation and research personnel, anti-poaching units, other government bodies and in certain instances, handicapped people.
South Africa’s off-roaders are working with the Department of Environmental Affairs on a self-regulatory strategy, which will address inland areas. Damage has been done to Fynbos vegetation in the mountainous areas, as well as to inland rivers and wetlands. Make yourself aware of any sensitive areas on your route and do your best to avoid them.
4x4s allow us the freedom to venture into inaccessible terrain. We have a good road infrastructure, favourable climate and abundant trails, but with this comes a responsibility! As an off-roader you are an environmental custodian, it’s up to you to be a good one and leave the right impression!
General Terminology
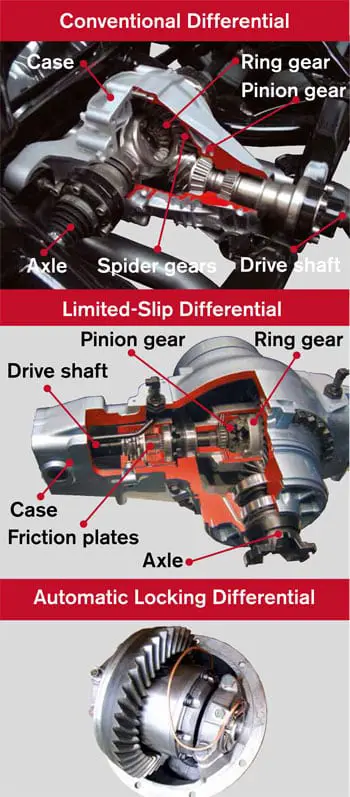
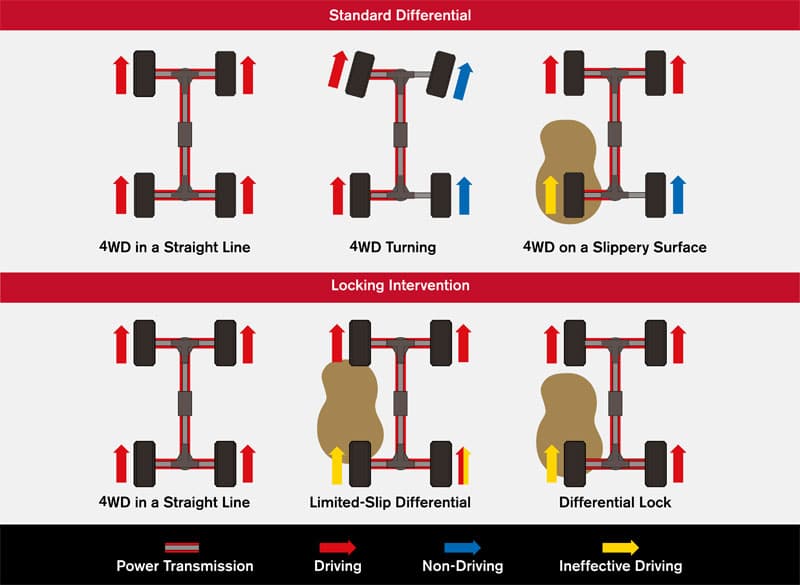
Diff-lock: Commonly known to off-roaders as a locker, the differential lock or diff-lock is a variation of a standard open differential. An axle has two side shafts joined to the differential that is driven by the differentials gears. This allows wheels to rotate at different speeds when turning around corners. The open diff provides the same torque (twisting or rotational force) to each wheel. The gearing allows a different rotational speed.
In other words, in a left-hand turn, the differential will slow down the left-hand rear wheel allowing the right hand outside wheel which has less traction to cover the greater radius. This also stops what is known as tyre scrubbing or scuffing.
This is, however, a drawback off-road, when the loss of traction to a wheel is sensed more rotational speed is directed to that wheel causing it to spin wildly – at this point you are generally stuck.
That’s when the diff-lock comes to play; it overcomes this limitation by locking both wheels, allowing them to turn together regardless of the traction lost. This allows the wheel with traction to pull you through the obstacle.
Engagement may be electronic, pneumatic or hydraulic. As a rule, you will engage the locker before entering the obstacle if you were able to correctly assess the situation (read the line).
The same principle applies to lockers fitted to the front and rear axles as well as the centre lockers fitted to a full-time 4WD vehicle. In this case, the open centre diff prevents wind up between the front and rear axles and will be locked up when the vehicle goes off-road.
Selectable lockers, which are generally fitted as original equipment (OE) by most manufacturers, operate from a switch fitted on the dash or centre console to engage them. The benefits are better drivability when used as an open locker, with on-demand locking capability. Unskilled drivers put the drive train components and tyres under tremendous strain if they leave the lockers on. Lockers are particularly useful when axle articulation is limited (vehicles with independent suspension).
Limited Slip Differentials (LSDs) are a compromise. They operate automatically with a smooth action directing additional torque to the wheel with traction and are more capable than an open differential but they are not capable of the full lockup of a diff lock. They are however a passive safety feature as they will operate when slip is sensed e.g. If you skid on a wet tar road!
Aftermarket Automatic Lockers engage and disengage automatically with no intervention from the driver (when a wheel is required to spin faster during cornering). Automatic lockers tend to be harder on tyres and can be noisy when engaging and disengaging.
More modern vehicles have started using traction control systems, sometimes in tandem with a rear diff-lock. These systems use wheel sensors coupled to a central processing unit (CPU) to monitor wheel speeds, if slip is sensed between wheels, the traction control system momentarily brakes the slipping wheel, transferring power to the wheel that has traction. Many of these systems use the ABS (anti-lock braking) to perform this function.
Critical Angles and Dimensions:
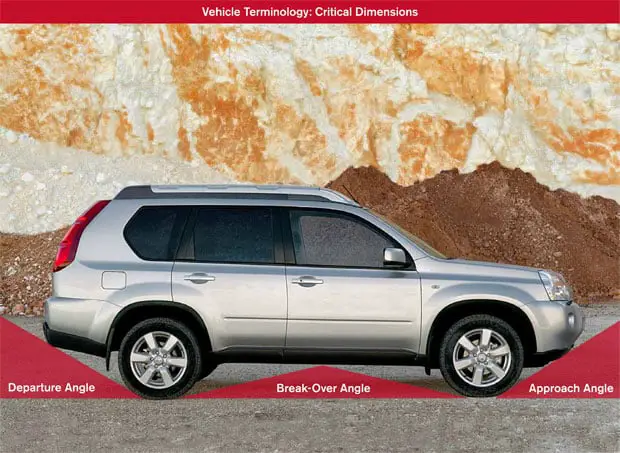
Approach Angle: The maximum angle that a vehicle can climb or descend into an obstacle without hitting its front. The type of bumper and the location of the front wheels are very important here, if set far back they will reduce this angle. Fitting an offroad replacement bumper will also improve one’s approach angle.
Departure Angle: The maximum angle at which a vehicle can exit an obstacle without fouling. This also applies when reversing out of an obstacle. Many aftermarket items such as tow bars, long-range tanks, low slung spare wheels and drop plates can reduce this angle.
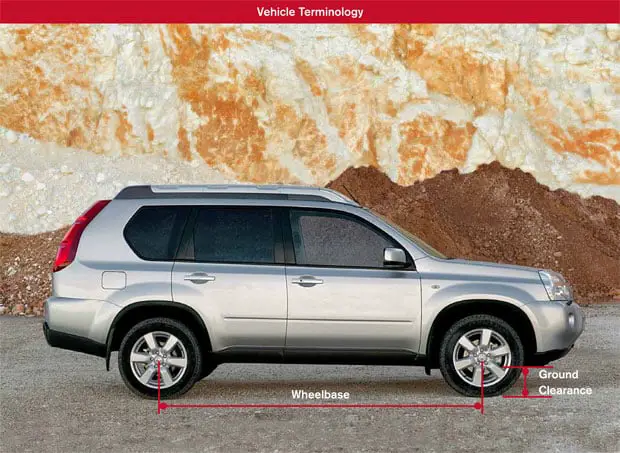
Ramp or Break-Over: The angle formed by lines drawn from the front and rear tyres footprint to the midpoint of the wheelbase on the chassis. The greater the angle, the less likely you are to break over on a ridge and foul the underside of your vehicle. Ground Clearance Measured on a level surface this will be the distance from the bottom point of the lowest component to the ground-generally the rear differential casing.
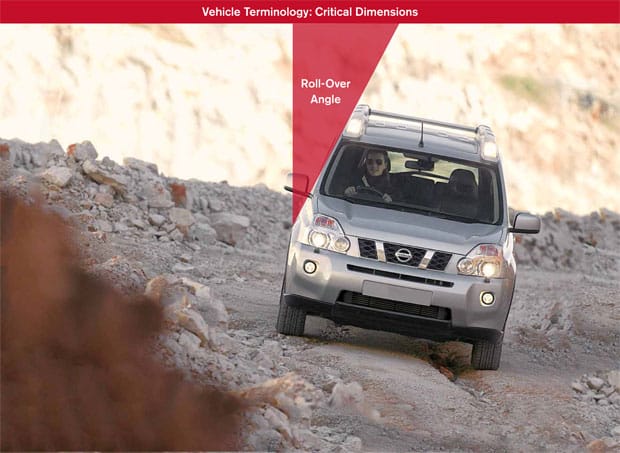
Roll-Over Angle: Your roll angle is the angle measured from a vertical line that your vehicle adopts when cornering, obviously influenced by speed and the centre of gravity as well as the height/load combination. Your roll-over angle is the maximum angle at which you can either negotiate a steep side slope or corner at speed before the vehicle rolls.
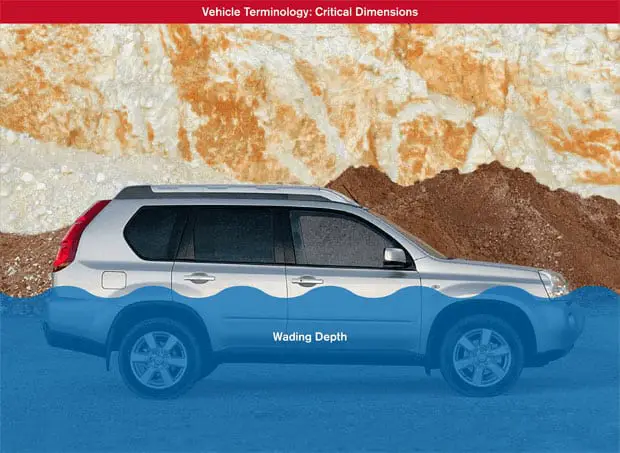
Wading Depth: Check your vehicle’s handbook for this important measurement. Taken on a flat surface it is the point at which your engines air intake will ingest water when traversing water. Ingestion of water into an engine could lead to the failure of mechanical components and a costly repair bill.
If in doubt wait for the river to flood out! In Africa, flooding rivers normally subside after about two hours. Consult the locals, as there is often a better crossing around the corner. If you have to cross, fit a wading sheet over the nose of the vehicle, as this will keep water out of the engine compartment if you maintain a steady momentum.
A steady momentum pushes a bow wave away from your vehicle and lowers the water level around the vehicle slightly. If you strike a hidden obstacle or stall, the water will wash back over the nose of the vehicle.
Some off-roaders even suggest attacking the crossing at a 45° angle with a predetermined exit point, this keeps the flow of water to the side of the vehicle rather than head-on.
If you cannot safely walk in the river – do not attempt the crossing. If you are unable to ascertain the depth of the water crossing you could even try and reverse
Wheelbase: The distance centre to centre from the front wheels to the rear wheels on the same side.
Centre of Gravity: The centre of mass in a vehicle. It can change dramatically due to passenger load, cargo and driving dynamics. Due to design and factors such as ground clearance, it will be higher than that of a passenger car. Thus rendering a vehicle unstable under situations where loss of control is imminent, e.g. cornering too fast on gravel, skidding on gravel, sharp steering movements, traversing slopes etc.
You should note that wheelbase (height and track width) plays a key role here. This means that load distribution is critical, weight should not go on the roof but rather as close to the rear axles as possible. Changing the track width of your 4×4 may improve your centre of gravity but could come with adverse consequences.
Power Sources:
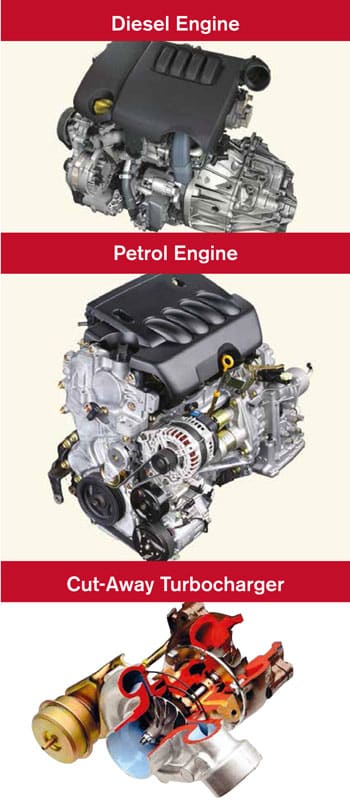
Diesel: A diesel engine uses a system known as compression ignition. It is a closed system, making it marginally more waterproof than a petrol engine. Starting is by means of a glow plug, which is much like an element for cold starting. Torque develops at lower revs making diesel 4x4s ideal for off-road use. They are more economical than their petrol counterparts but some have shorter service intervals and require the lower sulphur fuels that may not be readily available. Modern diesel engines are quieter, cruise well on road and are well suited for towing. Some vehicles suffer from lag – delayed response to throttle at high altitude.
Petrol: Known as a spark ignition engine – a spark ignites the fuel in the combustion chamber. Petrol engines deliver their torque at higher revs and have longer service intervals. They are not as forgiving as diesel derivatives when off-road and require unleaded fuel, which is not available across Africa. They cruise easily at all speeds and tow well.
Biodiesel and Liquid Petroleum Gas (LPG): Is very popular abroad, performance is similar to petrol and is cheaper as it is not taxed. Space is lost, as you have to fit an extra tank. Biodiesel contains vegetable matter and performance is similar to diesel.
Turbocharger: Engine performance can be improved by fitting a turbocharger, this utilises exhaust gas to force the air/fuel mixture into the cylinders under pressure thereby increasing power.
Intercooler: Cools intake gases from a turbocharger, cooler air is denser and richer in oxygen, which improves ignition.
Snorkel: Many off-roaders mistakenly believe that a snorkel is a device fitted to the air intake that enables you to wade through incredibly deep, long stretches of water, if correctly fitted and sealed it can, however prolonged immersion in water may ultimately cause a relay or other electrical component to fail as they are not waterproof. A snorkel allows your vehicle to breathe cooler, cleaner compressed air, which optimises engine performance.
Transmissions:
This is really a matter of preference, as some prefer manual gearboxes whilst others prefer the feeling of control that an auto box gives off-road. Many auto boxes have a manual mode enabling one to shift gears oneself and some feature a lock done mode to a crawl gear, which allows absolute control, as the vehicle will not run away from you.
Automatic gearboxes tend to have an advantage under conditions where there is a lot of slip (clay and mud) as you can limit wheel spin. Many off-roaders still express a preference for a manual transmission as they feel more in control of the vehicle and the situation they may be in if able to change gears themselves and prefer the ability to
Transfer Case: Is an additional gearbox transferring power equally to the front and rear axles. A two-speed transfer case would typically transfer power in a high ratio: 1:1 gearing and in a low ratio: 2:1 gearing (or lower in certain cases).
High Range 4×4: For mild conditions to override slip and where speed is a requirement such as sand and gravel driving.
Low Range 4×4: Used in more arduous terrain requiring control, total power and torque at slower speeds. Used on sand and beaches but to avoid bogging down through excessive wheel spin one should run in a higher gear. This depends on the power source (petrol or diesel) and the driver’s experience.
Drive Train: Power goes from the engine to the gearbox through driveshafts to the differentials and the wheels via the side shafts – this is your drivetrain. Four-wheel drive systems that exist are:
All-Wheel Drive (AWD): A system in which all four wheels are driven that lacks a multi-range transfer case. Generally, have a lock mode to equally distribute power when offroad. Sensors and the CPU control power to the wheels.
Full-Time 4×4: A vehicle that constantly has power to all for wheels, power cannot be disconnected, has a centre diff lock to equally distributing power to both axles when going off-road.
Part Time 4×4: A vehicle fitted with a 4×4 system where the power to the front wheels can be disengaged manually (lever) or electronically (switch). For non-off-road conditions, the rear wheels are powered. Clutch: Used in manual transmissions to disconnect the drive from the engine to the gearbox. The clutch is operated using the clutch pedal, either mechanically (by cable) or hydraulically, and consists of a pressure plate (fixed to the flywheel) and clutch plate, activated by a thrust bearing. Depressing the clutch pedal will cause the pressure plate and clutch plate to move apart, interrupting the transmission of power to the gearbox.
Locking Hubs:
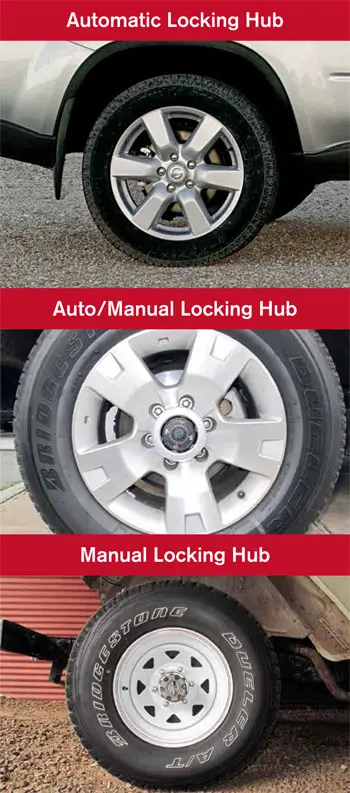
Manual Freewheeling Hubs are fitted to allow you to disengage the front hubs from the side axle shafts when 4WD is not in use, which reduces wear and tear. You have to physically engage them by moving a slide on the hub from the free to the lock position – on both front wheels.
Automatic Locking Hubs perform the same function when 4WD is engaged, except the driver does not leave his seat, certain automatic freewheeling hubs have an additional manual lockup using a wheel spanner or socket for rough terrain.
Braking Systems:
Vary according to the sophistication and price of the vehicle in question. A standard setup consists of brakes to the wheels, which may
Anti-Lock Braking System (ABS): Wheel sensors that stop lock up and skidding by cadence braking.
Electronic Brake Force Distribution (EBD): A braking system that distributes braking pressure to individual wheels.
Electronic Stability Programme (ESP)/Vehicle Dynamic Control (VDC): A system coupled to ABS wheel sensors that determines possible loss of control when cornering and corrects this either by brakeing a wheel or reducing throttle.
Chassis and Suspension:
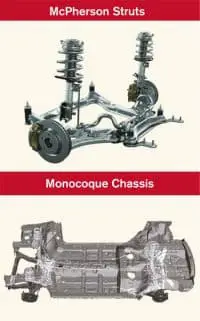
The Chassis: A frame to which the body is mounted, the suspension and axles are mounted to the underside keeping the wheels in contact with the terrain. General configurations are ladder frame and monocoque.
Ladder Frame Chassis: Consists of two parallel beams running lengthways joined to one another by cross members. Axles and suspension are mounted to the chassis.
A Monocoque: A unitary construction, all components are integrated (body, chassis, suspension etc.). This system is used on many modern SUVs and gives passenger car-like ride comfort. Wheel articulation and the vehicles ability to flex is reduced.
Independent Front Suspension (IFS): Allows wheels on the front axle to move up and down independent of one another, used on most Double and Single Cabs coupled to a live rear axle.
All-Round Independent Suspension: Fitted to many modern SUVs allowing all the wheels to move up and down independently this reduces wheel travel but gives a more comfortable ride.
All-Round Live Axle: A solid or beam axle allowing opposing wheels to operate in tandem. Coupled to coiled springs and shocks. Tough pick-ups and large wagons use this, offers greater travel but compromises ride comfort.
Multi-link: Solid-axle suspension design using coil springs instead of leaf springs, the axle is located by longitudinal and lateral suspension control arms or links.
Torsion Bar: Suspension spring that looks like a long metal rod. One end is attached to the vehicle’s chassis, and the other end is attached to the suspension’s control arm. When the control arm moves, the torsion bar is twisted and then springs back to its original shape.
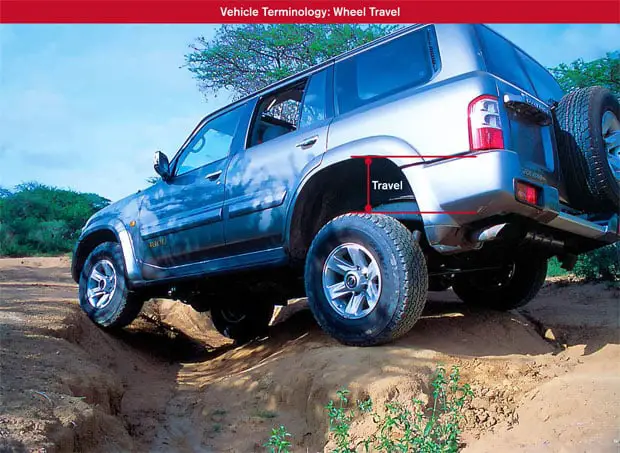
Wheel Travel: The total distance a wheel can move up and down; affected by suspension travel and wheel well clearance. More wheel travel means a more flexible suspension and more traction.
Articulation: The ability of the wheels on an axle to follow the terrain and maintain contact (keep traction) with one wheel going up and the other down to their fullest extent.
Cross Axle: This happens as diagonally opposing wheels e.g. right rear and left front begin to lose traction.
Off-Road 4×4 Driving Guide: Part 2 – Vehicle Recovery
Due to the multiplicity of variables involved it is not possible to guarantee the success of the recovery, the safety of bystanders, participants or property. You should attend a professional recovery course and always follow the manufacturer’s instructions with regards to your equipment and vehicle.
General safety considerations
- With all recoveries, the following should apply:
- A standard tow bar or tow ball is unsuitable as a recovery point;
- You should have suitable, professionally fitted recovery points to the front and rear of all vehicles involved in a recovery;
- Follow equipment safety and usage instructions;
- Assess the situation and where possible make the stuck vehicle easier to extricate by digging if badly stuck in the mud, or packing ruts with small rocks or branches.
Equipment:
Recovery Kit Bag. Keep all equipment in a single bag that is readily accessible. Never store wet and dirty equipment in a bag or mix it with other equipment such as tools or other supplies. The best bags are made of washable Cordura with eyelets to anchor gloves, breathable pockets for straps and drainage holes in the base. The bag should also have loops for shackles and inner sidewall pockets for items such as recovery blankets and links.
Shackles. Use rated alloy recovery bow shackles with a Work Load Limit (WLL) of not less than 2 000kg to attach the strap, cable or rope used. (Fed Spec RR-C-271b/Factor of safety of 6:1). Pack a variety of bow shackles to cater to all vehicle weights, a good range will be from 2 Tons to 6,5 Tons to cover all situations.
We do not recommend that you use commercial or D-Shackles: a commercial shackle will not show it’s rating and the pin and body will be of the same diameter. On a rated shackle the pin and body will be of a different diameter (pin is thicker). The body is embossed with the Work Load Limit and batch number. A bow of the shackle has a larger inner working radius offering more space for attachment of straps and the ability to achieve greater angles when recovering. After tightening a shackle turn the pin a half turn back, this will make it easier to open after the recovery.
Gloves. Are essential to off-roading, gloves are not only used for winching, they offer protection from heat, dirt and even when collecting firewood. The ‘gardening’ or ‘welding’ variety often used are not recommended as a glove should fit comfortably and still allow ‘feeling’ when working. Good gloves have the following features:
- Durability – strong leather (cowhide).
- Protection – through the reinforced double palm.
- Accessibility – solid brass eyelets with a karabiner for joining and attachment to belt loops or within your vehicle.
Ropes, Straps and Cables:
- Do not use damaged ropes or straps.
- Do not knot ropes or straps.
- Keep straps or ropes away from hot exhausts.
- Regularly inspect your equipment- especially after use.
- Straps and ropes are not to be used for lifting equipment.
- Always recover in as straight a line as possible.
- Use a bridle if necessary to straighten out the pull and never pull at an angle greater than 60° from the centre line of the vehicle.
- Keep participants and observers well clear of ropes, straps or cables in case of recoil due to a failure (as a rule generally twice the length of the cable, strap or rope utilised).
- Dampen cables, ropes and straps with recovery blankets (one per 5 meters of rope strap or cable).
- Protect cables from cutting or abrasion when pulling over obstacles: also check that there are no sharp edges on the underside of the vehicle that may cause a failure.
- Never step over a tensioned cable, rope or strap.
Straps and ropes should be washed after use in sand or mud to remove abrasive particles. Thereafter they should be dried in a cool dry area prior to packing as the fibre is sensitive to UV rays.
A strap from a reputable manufacturer should have a label stitched in, detailing not only compliance to SANS 94 but also:
- Manufacturers name
- Technical spec
- Instructions
- Material
- Strength
- Length
- Application
- Work Load Limit (laden vehicle mass)
- Factor of safety and/or the minimum breaking strength.
NB: An unlabelled strap should not be used. It is important to note that 10% of damage to a strap equates to a 50% loss of its rated capacity.
Your strap should be purchased in accordance with the vehicle you drive in terms of the maximum laden vehicle mass. End loops should be well constructed with a loose, movable sleeve to prevent wear and tear and allow full protection.
Pull/Winch Extension Strap (first line of defence). Made of low elongation, high tenacity polyester with limited stretch. The strap is used to pull or tow stuck vehicles through or over an obstacle in a controlled fashion. Always attempt to recover in a straight line. After securely attaching the strap to both vehicles take up the slack. The recovering vehicle then moves off at a moderate pace to start the recovery. The movement should be gentle without any jerking. In an absolute emergency, a Pull Strap can be used as a tree trunk protector and to lengthen a winch cables reach.
Kinetic Energy Snatch Straps and Ropes (last line of defence). Made of high elongation, high tenacity polyamide, and most kinetic straps elongate between 20—25% of their original length, converting potential energy into kinetic energy. This is a dynamic elastic rebound and is used to recover a badly stuck vehicle from sand or mud. The strap is normally laid out on the ground in an S formation (about 2 metres). The recovery vehicle moves off normally in 1st gear, low range in a straight direction away from the stuck vehicle and extends the strap to its maximum elongation. Try to stop your vehicle before the strap stops you, this allows maximum utilisation of the kinetic energy without shock loading the strap or rope and overloading the vehicle recovery points. If the vehicle is still stuck a new rope or strap may have to be used, alternatively the vehicle may need to be winched out.
The kinetic energy recovery rope is used similarly to recover severely stuck vehicles from sand or mud, possibly after a kinetic strap. The rope is an ultra-high elongation, high tenacity, plaited polyamide rope and can elongate 30—40% of its length. Once used it should be loosely piled to recover its kinetic capability, do not immediately pack it away.
In both cases, recovery from rest to re-use is once in 24 hours. Kinetic Energy Snatch Straps and Ropes are generally regarded as the last line of defence. Kinetic straps and ropes should never be used to anchor a winching operation or extend a winch cable.
Kinetic capability (strap used as an example). As a rule, after one snatch, the kinetic capability has been used up and the strap requires eight hours for every 10% of stretch to creep back or be restored to its original capability, 25% requires 24 hours rest.
A 10% stretch on a 10-metre strap would be one metre. The reduction in elongation is affected by usage and age. For example, when such a strap has stretched to 13 metres and no longer returns to its original length, it has lost its kinetic capability. It could still be used as a pull strap in an emergency.
There are two phases to the recovery of a strap: namely, the latent phase, which is over time, and an immediate phase when the strap rebounds, restoring a small minimal kinetic capability.
It is important that you should understand that maximum elongation is also the point where a failure could occur!
Important Factors Influencing Kinetic Capability
- Mass of the two vehicles.
- How stuck the vehicle is.
- The rope or strap utilised should be rated according to the mass of the stuck vehicle.
- Traction available to the recovering vehicle — in other words, the road surface.
- A speed of 18Kph is suggested in the case of two vehicles of similar mass.
- The distance between vehicles and the speed at which the recovery vehicle moves.
Tree Protector Strap. The tree trunk protector is designed to protect the bark of a tree when using a winch or rerouting a cable from a tree with a snatch block. In all situations, it provides a safe, secure anchor point. The tree trunk protector should be more than 75mm wide, and 2—5metres long. It should be placed as low down as possible on the base of the tree. Avoid jerks and movement which will damage the tree’s bark.
The Recovery Link. Only join straps and ropes with the same rating and type. To ensure that the fabric which makes up the eyes of the rope or webbing does not bind onto each other due to the force of the recovery, a link is inserted between the two eyes to separate them. This is made out of multiple layers of webbing tightly stitched together. The rigid link takes the place of the traditionally used branch or newspaper and what’s more it has a retention strap with a quick release fastener to ensure that it stays in place whilst the straps or ropes are not yet under tension. It is not safe to join straps or ropes with a shackle. Should a failure occur the shackle will become a deadly missile!
Recovery Safety Lanyard. Used when recovering vehicles for added safety in the event of a strap, rope or cable failing. It is made of low elongation (5%) high tenacity polyester webbing and is attached to the vehicle and over the strap, rope or cable by two loose ring hitch knots, it is not attached to the same point as the bridle or strap/rope/cable used. The suggested length is 1,4 metres.
Recovery Bridle. Spreads the load across two anchor points when recovering a stuck vehicle in much the same way as if one had done this with a choker or drag chain. However, as it is made from low elongation (5%), high tenacity polyester webbing which is softer on vehicles in the case of a rebound. The safe option is to use the bridle in conjunction with two lanyards. The suggested length is 3,5 metres and it should have reinforced eyes on each end with a moveable encapsulated sleeve to protect the area where one fits the rope or strap. The bridle is attached to the vehicle with rated bow shackles.
Recovery Blanket. Dampens the shock in the case of the failure of a strap, cable, shackle or recovery point. The unit is like a tube and is fitted over the recovery equipment in use (rope, strap or cable), the compartment at the base is filled with sand to provide the weight that dampens recoil in the event of a failure. One must carefully evaluate the number of blankets required: if doing a vehicle to vehicle recovery one blanket should be used per 5 metre of strap, rope or cable if multiple points are used in winching with snatch blocks more blankets would be required.
The Hand Winch. Cheaper than an electric unit and portable. When not in use, the cable, handle and winch can be stored out of the way. The typical unit comes with a cable and a handle for winching in and out. Jaws in the winch grip and move the cable as the handle is cranked. All safety procedures should be followed. A snatch block can be used in conjunction with the winch. To lengthen a cable, you can use a pull strap. A hand winch is a highly effective piece of equipment but it requires manual effort.
Operating safety comes with the shear pins built into the crank. Replacement pins are contained in the handle. Use recovery blankets when winching and observe their position as the cable approaches the winch. Hand winches can pull at a variety of angles as well as from the front or rear of a vehicle and do not depend on battery power.
The Snatch Block. Can be used to change the direction of your winch cable if you need to winch in a straight line or when line splitting (see winching). Always ensure that you have spare circlips for your snatch block. It is best practice to use a snatch block that does not have an exposed wheel.
The Drag Chain. Also referred to as a choker chain the drag chain consists of a length of round, welded, steel-link chain with two removable clevis-type grab hooks able to link back over the chain and lock in place. Typical uses are:
- Where recovery points do not exist, the chain can be locked around the chassis on both sides to form an inverted ‘V’. In this way, both sides of the chassis share the load.
- A section of the chain can also be used with a high-lift jack if no high-lift point exists for attachment to an off-road bumper or tow ball.
- The chain can be used to anchor off large rocks for recovery.
- Towing in emergency situations (as a last resort).
- The chain can be tied around obstacles such as trees which have to be moved. Do not use a strap for this as you are likely to chafe the webbing.
A drag chain should be labelled, showing that it is rated and tested as well as detailing its batch number and manufacturer’s identification. The minimum breaking strain should not be less than 8 000 kg and should be a minimum of 3,5 metres long.
Winching:
For electric, hydraulic or any other type of winch we suggest you refer to the manufacturers operating instructions before using. The following guidelines will, however, be useful in the bush.
On installing a winch if you have a steel cable it will still be in a loosely woven state on the drum. It is advisable to unspool it and pre-stretch it under load to tension the cable which will reduce the risk of it binding onto itself in use. At the same time, this dry run allows you to get used to the winch and its operation.
Always pay attention to the manuals safety instructions as well as general recovery safety protocol, you are using mechanical equipment and the dynamics place the winch, mounting points, attachment points and cable under severe strain.
The Main Winch Components Are:
The cable. This could be a steel cable or plasma rope, its length and thickness will be determined by the rated capacity of the winch. It feeds through the fairlead rollers and is looped at the end with a clevis hook. The fairlead guides the cable onto the drum and minimises the risk of damage to the cable.
Before and after winching, inspect the cable for damage, a kinked or frayed cable should be replaced as it will no longer operate at its rated capacity. Never hook the cable back onto itself as it will cause damage. Use a tree protector or other attachment point. Unwind as much cable as possible even if you have to double line the cable, or attach it far away from the vehicle, as maximum pulling power is on the first layer of rope on the drum. Never winch with less than five full turns of cable on the drum. Winches can also run synthetic plasma ropes instead of usual steel cable. There are advantages and disadvantages to both.
It’s up to you to evaluate your requirement before changing.
Plasma Rope. Is made from Ultra High Molecular Weight Polyethylene Fiber (UHMWPE). Consider the following when selecting a rope:
- Some plasma ropes can degrade with the heat caused by the brake within the winch’s drum.
- Steel winch cables are prone to kink, rust, and have very sharp strands once damaged.
- Plasma ropes are easier to handle and store.
- Plasma ropes are more susceptible to sharp edges (bumpers and rocks in particular) but are stronger and safer.
- Being lighter also makes them safer in the event of a failure, when released they virtually fall to the ground.
- Plasma ropes are more expensive than steel cable.
The Control Box And Remote Control. Transfers electricity from the battery to the winch motor. The remote control plugs into a control box allowing you to control the winding direction and stand clear of the recovery. Position yourself behind the driver’s door with the bonnet up or remain seated. This allows you to use the vehicle’s foot brake to anchor your vehicle. You must always be in control of the remote and it should only be plugged into the control box when winching commences.
Gears. The reduction gears convert the motor’s power into a pulling force at its rated capacity on the first layer of cable on the drum.
The Motor. In an electric winch, the motor is powered by the battery and using the gears turns the drum, winding the cable.
The Drum. The drum is a round cylinder onto which the cable is wound. A brake is housed inside the drum, it engages automatically when the motor is stopped preventing the cable from winding out.
The Clutch. The clutch disengages the drum from the gears or engages the gears allowing the drum to rotate freely (free-spooling) or to be locked. The clutch should never be disengaged if the cable is under tension (winch is under load, i.e. live).
Operating A Winch:
- Assess the situation, look at the recovery points and clear any obstructions.
- Always wear leather gloves to protect your hands.
- Disengage the clutch to unwind the cable-this will save your battery.
- Pull the clevis hook out using a hook strap.
- Wind the cable off the drum to a suitable recovery point. This may be a natural anchor such as a tree or in the case of a vehicle to vehicle recovery a professionally fitted recovery point.
When using a tree use a tree protector:
- Anchor the winching vehicle by means of its handbrake.
- The vehicle should not be in gear.
- Secure the cable to the recovery point.
- Use a rated alloy bow shackle.
- Once tightened, slack off a half turn.
- Position the shackle pin at right angles to the direction of pull. This will ensure that you can loosen the pin after winching (it may stretch under load).
- Engage the clutch by switching the lever, this locks the drum.
- Connect the remote, keep the cable clear of the winch and fairlead, if winching from within your vehicle, lay the cable out so that it can not foul and pass it through the vehicle window.
- Take up the slack by slowly tensioning the cable.
- The cable is now live and dangerous, bystanders should be clear (at least twice the length of the cable) no one should step over the cable.
- Dampen the cable using recovery blankets (at least one per vehicle, two if using a natural anchor).
- When line splitting more may be required.
- Check the rigging once more prior to proceeding.
- If using an assistant to guide you, ensure that clear hand signals are used. Indicate winding in with a hand above shoulder height and turn your hand in an anti-clockwise direction. Indicate winding out with your hand at waist height turning it in a clockwise direction. For an intermittent pull, close and open your thumb onto your forefinger. To stop winching, hold your fist up above your shoulder.
- Avoid pulling at an angle as the cable will wind up in a bunch to one side of the drum which could damage the cable or winch, this also decreases the rated capacity. If you need to straighten the cable out it may be necessary to do an angled pull using a snatch block.
- Winch with smooth movements and avoid jerks, the shock load can cause damage.
- Once the vehicle is on stable terrain, the recovery is complete.
- Ensure that there is slack in the cable and it is not under tension.
- Disconnect the cable.
- Check that the cable is neatly wound onto the drum, if uneven, it may be necessary to rewind the cable.
- If rewinding, guide the cable back onto the drum using a hook strap.
- Keep the cable under tension and walk the cable back onto the winch.
- Either attach the hook to a suitable recovery point or tension between the fairlead rollers.
- Disconnect the remote and store it in a safe place.
A Few Winching Tips
- Keep hands and clothing clear of winch components.
- Do not move the winching vehicle whilst winching as you could overload the winch. If the recovery is difficult, pause to allow the winch to cool down and allow the engine to recharge the battery.
- If recovering a heavy vehicle, unload as much weight as possible to make recovery easier.
- For self-winching without an anchor point a steel stake, sand anchor or a spare tyre (buried deeply) may be used.
Winching in a straight line which allows the cable to wind onto the drum neatly. If this is not possible, use a snatch block secured of a point in front of your vehicle and re-route the cable at 90° to another attachment point or vehicle.
Using a snatch block also allows you to increase the pulling capacity of the winch (although it reduces line speed) Double lining allows you to pay out more cable and use the rated capacity of the winch, both lines should be parallel to achieve maximum power.
Triple-lining will increase power over a double lined setup, the extra power may be required in a situation where a vehicle is difficult to extricate.
Off-Road 4×4 Driving Guide: PART 3 – Terrain Crossing
How to cross diverse terrain
Before you set off, check your seating and hand positions.
Seating. Be comfortable and sit in a fashion that ensures that you are not pulled away from the wheel when travelling upwards or pushed forward when descending, keep your seatbelt on and your thumbs out of the wheel spokes. Even with power steering your thumbs could get injured if the wheel kicks back-this could happen if the vehicle stalls and power steering is lost. With regard to seatbelts and child-seats follow all manufacturer specifications as well as the relevant ISOFIX standards.
Hands. Generally, a ten-to-two position is taught: however nowadays with the fitment of airbags, one should drive in a quarter to three position. If the airbag deploys your arms will be protected, being outside the force of the bag. Keep windows closed almost to the maximum as you do not want branches to swing into the vehicle and injure you or your passengers. This is also safe practice in the event of a rollover as all limbs will be contained within the vehicle.
Your Line. A key skill is the ability to select or read a line and commit to it. When off-road the ability to keep your wheels in contact with the ground is paramount. Your line is the path that you select to maintain traction through the obstacle. A good line will keep your wheels on the ground and not offer resistance. This coupled to the knowledge of your vehicle’s capabilities and dimensions will optimise your off-road experience.
Look Before You Proceed. If conditions allow it get out of your vehicle and survey the obstacle by walking through it to determine your entry and exit points use your passenger as a spotter to guide you through difficult obstacles with hidden hazards. Walk before you proceed and take nothing for granted. To maintain the line it may be necessary to fill ruts and axle twisters, rebuilding a section of road ensures that you get through the obstacle safely, this assists in maintaining the trail. Wheel-spin is dangerous and leads to a lack of traction while damaging the environment, avoid this (decelerate). Keep a safe distance between vehicles. Enter an obstacle when you are sure the vehicle in front of you is clear. Avoid travelling after sunset or before sunrise, as this is when most collisions occur.
The Stall Start:
Learn the stall start and practice the following:
Manual Transmission
- Hold the vehicle on its footbrake and handbrake.
- Engage low-range reverse gear (1st gear if stalled on a descent).
- Remove your foot from the clutch Release handbrake.
- Remove your foot from the brake.
- The vehicle will settle.
- Turn the ignition key.
- The vehicle will start and move back slowly.
- Check and control your rearward descent until you are in a position to stop and re-try the obstacle.
Automatic Transmission
- Hold the vehicle with its footbrake, engage handbrake.
- Select reverse-low range (1st gear if stalled on a descent).
- Start the engine.
- Release the handbrake.
- Slowly release the footbrake and reverse or descend forwards.
If You Have An Ignition That Only Operates With The Clutch Depressed:
- Engage the handbrake.
- Depress the clutch and brake.
- Engage applicable gear.
- Start the engine.
- Release the handbrake, clutch and brake then reverse slowly.
In the case of a forward or rearward stall start, you may have to cadence brake until engine braking takes place. If you stalled on a decent, check the front of your vehicle as there may be an obstacle that caused the stall. On an ascent, one generally stalls because of insufficient momentum.
General Obstacles Encountered:
Engage 4WD before an obstacle. As a rule, high range for gravel and sand, low range for rough terrain. Do not forget to lock hubs – if you have manual hubs fitted. An obstacle is any hindrance along your route which may require 4WD. It is often a good idea to avoid really bad obstacles when travelling so as to ensure that you do not damage your vehicle.
Water:
- Avoid water and mud. If you can’t, the following tips should help you. Before entering the water, wading sheets should be fitted across the grille. A silicone spray can be applied to critical electric components to water-proof them, use a water repelling spray.
- Do not wear seatbelts when crossing water as you may need to get out of the vehicle in a hurry if things go wrong. In the case of a short, deep crossing, it is wise to open windows as well. However, when crossing long stretches of shallow water, close the windows and turn on the air conditioning to a high speed, this builds up a cabin ‘pressure’ which helps prevent water seeping in.
- Lubricant expands in hot transmissions and differentials. When water cools the lubricant, it contracts causing a vacuum which can suck water into a differential/transfer case through the breather pipe.
- Check the location of your breathers as it may possible to re-route them. On your return from a trip change transmission and differential oils.
- Check depth and strength of flow by wading the crossing, if there are animals in the water and you have to get through, have a spotter on the bonnet of a suitable vehicle and drive through. The spotter can probe the river bed using a long stick, checking for ruts, hidden obstacles and available traction.
- Enter water and mud slowly in low-range. Do not splash water over your bonnet as this could go into the engine compartment and affect the electrics. Aim for a predetermined exit point, keep engine revs low and do not spin your wheels.
- Keep a steady momentum which ensures a bow wave in front of your vehicle.
- If you run into an obstacle, switch the engine off before stalling.
- Evaluate the cause, if necessary recover the vehicle to dry land for analysis.
- Check the air filter to see if it is wet.
- Check oil to see if water has been sucked into the engine (a milky white residue indicates the presence of water).
- Do not restart the engine until the appropriate repairs have taken place.
- Once safely through the obstacle, check the vehicle for damage.
Mud And Soft Turf:
- You should be in low range 4-WD with differential/s locked.
- Select an appropriate gear, 1st gear will often cause wheel – spin and you could bog down.
- Choose the line of least resistance, if there is an existing track use it!
- Maintain a steady momentum and know the position of your wheels so as not to push against mud.
- Decelerate if necessary to control wheel-spin.
- If you feel a loss in traction, your tread may be clogged. Move the steering wheel left to right to clear the tread. Use your tyre’s sidewall against the wall of the track for additional traction.
- Be careful of hidden obstacles buried in mud.
- Avoid building up a wall of mud in front of the valance as you could get stuck.
- If in doubt, attach recovery equipment either to the front or to the rear of your vehicle before going into the mud.
- As soon as possible check your radiator. Mud clogs up its core which could affect its cooling. Check rims as dry mud will affect wheel balance when on tar again.
Ascents And Descents:
Establish your line before tackling an ascent or descent on a slope. Gradient and traction are critical here. Tackle the slope head-on to keep the vehicle level. If you go diagonally, your vehicle’s centre of gravity comes into play. With a lack of traction, the vehicle could slide or roll over.
Ascents:
- Check the terrain to establish your approach using your spotter, if it is smooth and not too steep, use gentle momentum.
- If it is rutted, potholed and rocky a low gear and less momentum should do the trick.
- Avoid bounce especially with independent suspension: this will cause a loss of traction.
- Be cautious when using 1st gear low-range on smoother surfaces as you may get wheel spin.
- Avoid gear changes and the momentary loss of traction.
- As you approach the crest, decelerate to avoid wheel spin and bounce.
Descents:
- Check your line using your spotter.
- Select the lowest gear to ensure a controlled descent. Avoid using the brake or clutch.
- Disengage the handbrake and release the clutch. Use engine braking/compression in a descent for control.
- If you start to run away, cadence brake to slow you down without sliding.
- Do not use your brake in a slide as this worsens the slide, rather accelerate to bring the vehicle under control. Do not change gears as the loss of grip coupled with forwarding momentum, could be disastrous.
Side Slopes:
- When off-road, you may be forced to traverse terrain diagonally.
- Get out and evaluate the slope to establish your line.
- Is the surface slippery?
- Are there obstacles that may impede momentum such as ruts or rocks?
- A momentary drop into a hole or rut radically increases lean.
- Ensure sure your load and loose items are secure.
- Use your spotter to guide you and check wheel position.
- If the vehicle slides or feels as if it is going to roll, steer down the slope, accelerating slightly. This will reduce the risk of a rollover.
Rocks Beds:
- Prevalent in mountain routes, dry river beds or river crossings.
- It is important that you know your vehicles clearances and the position of components under your vehicle.
- Slight deflation may be necessary as the tyre will grip better but you will lose clearance so rather start at road pressures.
- Check your line and use your spotter.
- Put a wheel on a rock to gain height.
- Proceed slowly in 1st gear low range, with sufficient acceleration to maintain momentum. This raises the vehicle, adding clearance to the undercarriage. This is very important with vehicles with independent suspension.
- Don’t straddle rocks. This may leave you hung up on the chassis or a differential, and cause damage.
- Tyre sidewalls could easily be sliced by sharp rocks, a slightly deflated sidewall is more puncture resistant.
Snow And Ice:
4x4s have double the traction of passenger cars, giving more grip. Braking is the same, except you are heavier so your stopping distance will be greater. That means that you have to watch your speed.
- Select 1st gear high range.
- Engage centre diff lock if the vehicle is a full-time 4×4.
- Pull away slowly and brake carefully to avoid lock-up.
- Be aware of hidden obstacles under snow.
- Do not push up a wall of snow in front of your bumper/valance.
- Fit snow chains if possible.
- Ensure that you have recovery equipment.
- In light snow, your tyres will break through the surface and compact it, but be wary of ice underneath.
- If others have driven the route before you be careful of sticking to their tracks as they may be slippery if so move out of them onto fresh snow.
- Snow off-road is safer as there is more traction as the surface is not tarred.
- An on-foot inspection by your spotter, probing the snow in much the same way as water is still required.
- Wheel-hub height is a safe depth to tackle.
Ruts And Erosion:
- Rough tracks often deteriorate into gullies due to water erosion.
- Driving in the ruts will scrape the underbody and could see you getting stuck.
- Power out of the rut and straddle it.
- If alone, wind window down to observe progress.
- Adjust side mirrors down to observe progress of rear wheels.
Sand And Dunes:
- High range is more suited to sand as it allows the correct momentum which gives flotation.
- As always you need to read the line, and check if the sand is dry, damp or wet.
- Dry sand disperses quickly and is difficult to get through.
- Damp sand offers the most traction. Sand is generally damp early in the morning and later in the afternoon or after rain. It binds together which allows better flotation.
- Wet sand has a shimmer, avoid these patches as they are dangerous.
- Salt flats can be treacherous, breaking through the crust can bog you down.
- Small dunes tend to be weak and are best avoided.
- Larger dunes allow sufficient space to attack them correctly, learn the technique to crest a dune and decelerate before going over, momentum and gearing are critical.
- On sickle dunes, stop before going over the crest as there is no back face.
- Deflation (± 50% of the recommended pressure for tar) and gear selection is key to flotation.
- Select a gear that you feel comfortable with. Some drivers use with 1st gear high range, others prefer low range 2nd or 3rd gear, but avoid wheelspin.
- Changing gears while driving will break your momentum.
- Follow existing tracks, when stopping simply decelerate. Braking will dig you in. Be aware of other vehicles and pedestrians.
- If you are following existing tracks and need to leave them, aim in the direction of travel and accelerate to ‘power out’ of the tracks.
Ditches, ‘Dongas’ and Sand Ridges:
- Cross obstacles at an angle, one wheel at a time. This increases the clearance of the vehicle, at all time try to avoid cross lifting your wheels.
- Enter the obstacle slowly, using engine compression in 1st gear low range to have control and stability.
- Crossing a sand ridge or donga head on may cause you to foul your undercarriage, or damage the rear end as which is generally longer than the front of your vehicle.
- Be aware of your break over angle, ground clearance and wheelbase. A long wheelbase vehicle requires careful driving.
Gravel Roads:
- Many 4×4 accidents happen here due to poor driving resulting in costly insurance claims or injuries. Corrugations on gravel roads are formed by vehicles that regularly use the road, when driving, find a comfortable speed.
- Watch your front wheel for a moment, you may feel comfortable but your wheels and suspension are really working and not always in contact with the ground.
- Due to the varying surface, braking capacity is diminished.
- Steering precision is also affected.
- On gravel, extra traction is required, use 4WD or AWD.
- Dangers areas are along the verges where sand accumulates as well as drop offs, if you go around a corner and your front or rear wheels leave the stable surface and slide – you could roll your vehicle.
- Be careful of erosion ruts along the sides of gravel roads, dropping a wheel into a rut could have serious consequences.
- Speed, hard braking and aggressive steering should always be avoided.
- Avoid driving on gravel roads at night.
- In poor visibility, put your headlights on and slow down.
- Avoid moving to the right side of the road as there may be oncoming traffic.
- Keep a safe following distance when in convoy or when vehicles are in front of you.
- Flying stones could damage your vehicle.
- Be aware of the surface at all time, many gravel roads have marble like stones which reduce traction.
- If travelling for long periods on gravel you can reduce tyre pressure (10% of road pressure).
Driving In A Convoy
From a safety and security
- Brief the group before departing, set communication protocols.
- Vehicles with essential equipment should be placed at equal intervals (29MHz radios, Satellite phones, recovery kits, first aid kits and fire extinguishers).
- Avoid travel after sunset and before sunrise.
- The last vehicle must be a competent off-roader to ensure that all convoy members complete the route.
- Avoid obstacles that some vehicles may not be able to traverse.
- Only enter obstacles once the preceding vehicle is clear.
- Ensure the vehicle behind you is following.
- Keep a safe following distance as the vehicle in front of you may need to stop or back up.
Pre and Post Trip Inspections
- Maintain the manufacturers servicing schedule!
- Use specified lubricants.
- Use the correct fuel and ascertain availability before departing.
- Inspect key components regularly.
- Maintain correct tyre pressure, do not forget to re-inflate tyres once back on tar or gravel.
- Check the condition of your tyres and take a repair kit.
- Know the vehicle’s coolant, fuel and lubricant capacities.
- Do not exceed the vehicles rated capacities.
- Follow the walk of life principles!
Tools and Spares
- Carry a full set of spanners and sockets, a mix of screwdrivers, pliers and wrenches.
- Wheel spanner, jack and jack crank.
- Bulbs and fuses.
- Belts and radiator hoses.
- Repair manual.
- Duct tape.
- Epoxy glue.
- Cable ties.
- Allen keys.
- Pre drilled steel bars (selection).
- Radiator seed net.
- Fire extinguisher and warning triangle.
- Wading sheet.
- Recovery kit.
- Collapsible hiking pole to check mud and water depth.
- Carry at least two spades, both with rounded noses and short handles.
- An air jack works well in water and mud and can help in a variety of situations.
- A comprehensive first aid kit is a vital, it should contain scalpels drips and Intra-veinous lines. A kit like this should come with prescriptions that will allow you to cross borders.
Check The Following Items:
- Radiator core is not blocked with grass or mud as it affects cooling.
- Grass caught up around the prop shaft, exhaust and catalytic converter could cause a fire when you stop.
- Attend 4×4 driving, first aid and recovery courses before going off-road.
- Get a 4×4 insurance policy that provides adequate cover when travelling outside South Africa.
Off-Road 4×4 Driving Guide: Part 4 – Off-road Tyres
Tyres are pushed to their limits when off-road, vehicle owners want a comfortable ride, handling as well as low noise under all conditions, in addition to puncture resistance, grip and flotation.
There Are Three Main Categories of Off-Road Tyres: • Highway Terrain (H/T). • Mud Terrain (M/T). • All Terrain (A/T).
All Terrain tyres offer a compromise between on and off-road ability, Mud Terrain tyres work best in more arduous off-road conditions whilst the Highway Terrain tyres are more suited to tarred or gravel roads. Most 4x4s are used as the main form of transport and do not regularly go off-road, so manufacturers tend to fit Highway Terrain tyres as original equipment.
Radial-ply tyres have parallel fabric casing cords that run from one side of the tyre to the other radially, making them more flexible. They also have layers of steel fabric running around the inner circumference just under the tread known as breaker belts. These steel belts ensure less tread movement under conditions of braking and acceleration and the flexible sidewalls ensure better tread contact when cornering. These days many manufacturers use light truck (LT) sidewall technology to make the sidewalls more puncture resistant.
The radial cords running from bead to bead reduce inner deformation in the shoulder and sidewall areas.
One should check the ply rating, higher ply ratings tend to indicate that the tyre will be more resistant to stone damage and sidewall penetration. Tread depth is important as well, whilst less depth equates to less movement when cornering and braking, a deeper tread gives a better overall ride and is less resistant to tread area punctures.
The Load Index. An internationally recognised numerical code indicating the maximum load expressed in kilograms that a tyre can carry at a speed specified in km/h indicated by the speed rating symbol. Speed Symbol Tyres are specified with speed ratings indicated by a speed symbol.
Aspect Ratio. This is the ratio between the tyre’s height from bead to crown and its width from side-wall to side-wall shown as a percentage (%).
Bead. The bead is the section of a tyre that comes into contact with the wheel rim. Tyre beads are made of high-tensile steel and anchor the tyre to the rim. Bead locking rims are very useful when operating with tyres at low pressures. The locking bead keeps the tyre in position on the rim, stopping it from moving around or separating.
Flotation. Flotation describes the tyre’s ability to stay on top of a surface and not sink in. This is achieved with a larger contact surface and low pressure and is used when driving on sand.
Footprint. This describes the area of tread that is in contact with the terrain.
Shoulder. This is the area on a tyre the area where the sidewall and tread meet.
Side-Wall. This describes the side section of the tyre extending from the bead to the shoulder.
Tread. The patterned surface made up of cleats or lugs which form a tread pattern. This part of the tyre comes in contact with the terrain. Tread patterns give an indication of their application and are recognisable between the A/T, M/T, and H/T types.
Tyre Tips:
Equipment:
- Take a tyre repair kit.
- A compressor or pump is essential.
- Always have a tyre pressure gauge.
- Incorrect pressures damage tyres.
- Fit metal valve caps with O-Ring seals.
Maintenance:
- Inflate to the manufacturer’s recommendation and regularly check tyre pressures.
- Inspect your tyres and check the balance and alignment after a trip.
- Rotate tyres as recommended by the manufacturer.
Deflation and Pressure:
- Deflation improves flotation when driving on sand or mud.
- It results in a larger footprint and improves traction.
- Deflation will reduce ground clearance.
- A deflated tyre may come off the rim (de-bead).
- Hot tyres reflect inaccurate pressure readings.
- On rocky terrain, slight deflation allows the tyres to absorb shock and mould around rock surfaces giving better grip.
- A softer sidewall is also less prone to sidewall penetration.
- Re-inflate tyres as soon as conditions allow.
- Avoid wheel spin with deflated tyres.
For more information visit: www.nissan.co.za
Read more on this topic:
If you’re interested in a guide for Recreational Vehicles, read this article on RV Tips & Tricks by Jane Rogers: 50 Best Travel Tips from 10 Years of Travel.

